
5 plants to start off your greenhouse

You’ve dabbled in gardening, and maybe you’ve made inroads into the world of growing various types of vegetables, fruits, and ornamental species. Now seems the perfect time to take your plant-growing skills to the next level — so you’ve gotten yourself a greenhouse!

Excellent. Now, you will be able to maximize the sun’s energy and extend your plants’ growing season. You’ll be able to increase the overall yield of your garden many times over. However, you can’t just slap a bunch of pots down in your greenhouse and dump seeds. (Well, you could, but it’s not recommended.) You need to engage in proper planning.

To make a good beginning, here’s a list of five common greenhouse plants that are perfect if you’re just getting your greenhouse started.
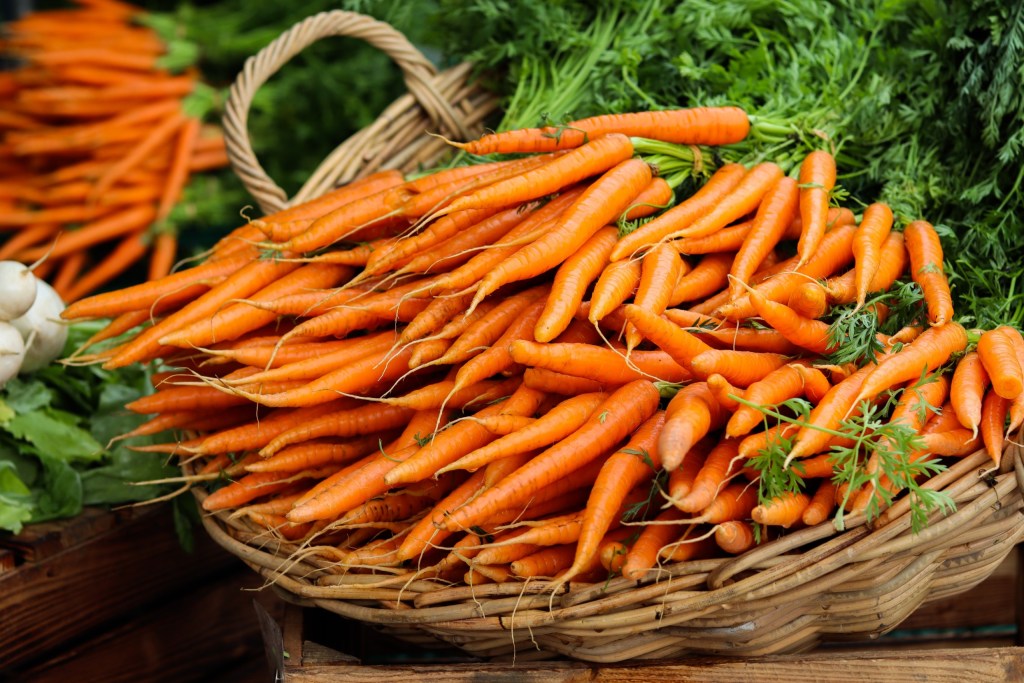
Orange Carrots in a Brown Basket
Photo by Hana Mara/Pexels

Carrots

Carrots are a great starter plant because you can plant them throughout the year. In fact, because you can grow them anytime makes them a trendy root crop.

To grow them properly, you’ll need to plant them in deeply tilled, sandy soil. Make sure the earth isn’t too thick or hard because otherwise, you’ll end up with strange-looking, rounded carrots that are a bit dwarfed in size.

Additionally, while carrots are easy to grow and are resistant to most pests, you’ll still need to check their seeds to ensure they’re disease-free before planting. You’ll find that your carrots are usually ready about 75 days after planting. However, sometimes carrot roots can take up to four months to ripen.

When harvesting them, use a garden fork to loosen the soil. It can be hard to pull them up otherwise. Finally, you should rotate your carrot crops every three years.

Asparagus

Asparagus plants can live up to seven years, and they’ll produce nicely over that time frame. When planting, try to make sure that you’re planting from a crown that’s one or two years old. You can yield enough asparagus for a household of four by planting about 20 asparagus crowns.

Keep in mind that you’ll have to ensure weeds and other plants are kept out of the area where you are growing your asparagus. Asparagus cannot tolerate competition. Most gardeners will use a trench (although some use deep containers) and plant the crowns 12 to 14 inches down.

When preparing the crown for planting, don’t cut everything off of it. Leave small spears and when planting, make sure that those little spears are pointing up.
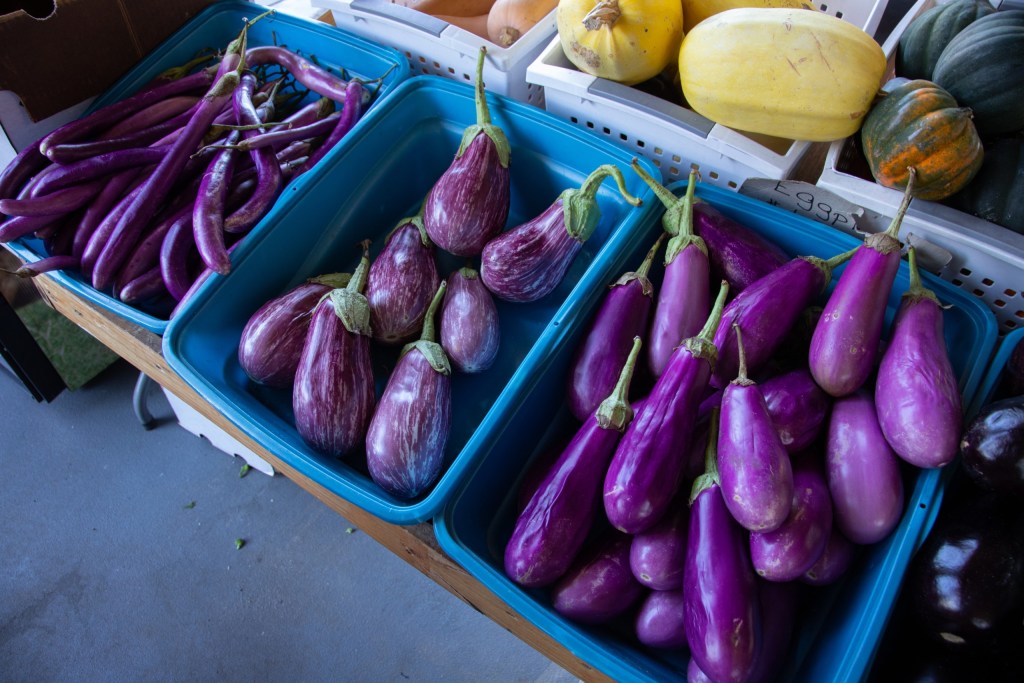
Top View of Eggplants in Containers
Photo by Mark Stebnicki/Pexels

Eggplants

Eggplants are perfect for greenhouses because they’re warm-weather veggies. Like tomatoes and peppers, they need warm conditions in which to grow. If you choose to grow eggplants, you should do so on a raised bed using composted manure.

You may have noticed that eggplant fruit can be rather large and relatively heavy. Due to its size, the actual plant can be overwhelmed by its own fruit and fall over. It literally cannot hold up the weight of its own fruit! Therefore, you’ll need to give your eggplants some help in the form of a stake or a cage. If you stake them, ensure that you use one that’s about 2 feet tall.

To prevent diseases, you’ll want to use a high-quality potting mix. Eggplants also need a lot of water; you can use a top layer of mulch to help prevent weeds and to retain moisture.

When it’s time for harvest (which ought to be about 16 to 24 weeks after planting), don’t pull or yank the fruit from the plant. Instead, cut the eggplant fruit near the stem. You’ll know the fruit is ready for harvest when the skin is smooth and bright. If you leave it too long on the plant, the fruit’s skin will eventually begin to wrinkle, and it’ll be past its prime.

Kale

Kale is an excellent plant for beginners because it’s so tough. Of all the greens, it is one of the most resistant to disease. When sowing, use seeding trays, and when the plant emerges from the soil, engage in regular hoeing to prevent weeds. Additionally, you’ll need to get rid of yellowing leaves that come out around the plant’s base.

Kale is considered easy to grow because the only thing it needs to thrive is adequate sunlight. It will grow even in sandy soil and in partial shade. Moreover, it keeps on growing and yields fresh leaves for a long time.

When harvesting, pick the bottom leaves first and leave those at the tip alone. Those at the end will then continue to develop new, fresh leaves.

Okra

Also known as “ladyfingers,” okra is one of the best greenhouse plants. They can grow perfectly well in containers, although you’ll need to ensure that they have plenty of water. Additionally, before sowing, you’ll need to soak the seeds in warm water.

When the seeds are big enough, simply transfer them to the containers you’ve chosen. Use a high potassium compost and fertilize the plants every week when they blossom.

A pro tip here is to harvest the pods a bit early before they’re fully mature. The reason for this is that ripe okra pods can be stringy and hard. Additionally, be sure to wear gloves since the tiny hairs on the fruit can irritate your bare skin.

Whether you’re a vegetable aficionado or you’re trying to help your kids learn to love their greens by growing some in your own backyard, these five plants are great places to get started when it comes to filling up your beautiful greenhouse. Good luck and happy growing!

Editors' Recommendations

When and how to transplant tomato plants for the best results
baby tomato plants

There's a time in every gardener's life when they try to grow their own veggie plants from seed. This is a gratifying process, and there are many benefits to growing your own seed starts. One of those benefits is bigger and healthier plants. By growing your own baby tomato plants, you can ensure that the plants are well cared for, never given anything you don't want them to have, and transplanted in just the right way at just the right time for optimal plant health. So how do you transplant tomato plants to ensure they're happy and healthy and live to produce lots of yummy tomatoes for your home?

How do you transplant a grown tomato plant?
If you've never transplanted tomatoes before, the idea can be intimidating. You have all these tiny plants that you've cared for over the last several weeks, and now it's time to pluck them out of their nursery pots and plop them into the outside soil where they're exposed to sun, weather, and critters. Luckily, you've cared for them so well that they're healthy and robust plants that will be able to handle anything nature throws at them.
Step one: Harden the plants
Hardening the plants is a term gardeners use when talking about the process of acclimating a greenhouse-grown plant to outside conditions. Typically it refers to sunlight, but it could also refer to wind and other weather that could harm the plant. About a week before you're ready to transplant, you'll want to harden your baby tomato plants by exposing them to sunlight at increasing increments each day. For example, day one should be about 30 minutes, then 45, then 50, and so on until the day of transplanting. If you don't do this, you'll risk your plant being burnt and killed when you transplant it outside.
Step two: Don't water the plants
Before you start pulling little plants out of their pots, you mustn't water the plants a few days before transplanting. Wet soil can make the transplanting process much harder on you and the plant. Dry soil falls away easier and is less likely to break off roots as you move the plants to their new home.
Step three: Prepare the new soil
The new location for your tomato plants will need to be prepped before you get all those babies out of their homes. Whether you are planting into the ground, a raised bed, or a pot, you'll want to amend the soil to guarantee that the plant has many nutrients to soak up. It also is easier if you dampen the soil right before transplanting. Damp soil is much more manageable and more easily manipulated around the plant.
Step four: Plant deeply
As you gently pull out the baby tomato plants, you'll want to shake off the old soil to expose the roots. This will ensure the plant has access to the new soil and nutrients you're about to provide it with. 

Read more
5 outdoor living trends that will totally improve your 2022
women outside sitting

After being stuck in our homes the last two years, we've started to realize that making our homes into a lovely place to be is very important. However, we can only stay inside for so long before we ache for sunshine and nature. Turning your outdoor space into a haven where you can escape the indoors and enjoy some fresh air will improve your 2022 no matter what it throws at us. So here are some ways to spruce up your outdoor living space so you can enjoy the spring when it finally comes back around.

Bring indoor luxuries to an outdoor space
The best way to encourage yourself to go outside more often is to make it as comfortable as possible. So often, we choose indoor seating instead of going outside simply because that huge sectional is way more comfortable to lounge on. So instead, invest in comfortable seating, plenty of surfaces for drinks and electronics, and maybe even purchase some umbrellas or awnings so you can sit outside even if it's lightly raining. Making an easy transition from indoors to outdoors will encourage everyone in the home to come out more often and enjoy the space.
Vertical gardening
Not everyone has the luxury of having an expansive backyard. If you're struggling to know what to do with your smaller space, but you know you want more plants and gardening opportunities, try vertical gardening! This is where you take a wall of your deck or fence and grow plants one on top of the other. You might have seen these as living walls or those DIY projects with pallets and herbs. Either way, growing flowers or veggies vertically allows you to garden without taking up precious space in your smaller yard.
Outdoor office
Many of us spend a lot of time inside at our desks. If you were lucky enough to work from home the last few years, you might have a pretty decent setup for your home office. However, spending all day inside when the weather is excellent can be depressing, and if you're home, why not take advantage of the opportunity and create an outdoor office space? This allows you to keep working while enjoying the sunshine and fresh air. Endless studies are proving that getting outside more often improves mental and physical health!

Read more
What you need to know about successfully growing summer squash in containers
container summer squash man cutting

You can roast it, you can sauté it, you can slice it, and you better believe you can dice it. Summer squash is chock full of important vitamins and minerals, so it’s delicious and nutritious. But if your garden is running out of real estate, have no fear. There’s no reason you can’t grow squash in a container. Although summer squash requires a not-insignificant amount of TLC, it’s more than worth it for lovers of this agreeable fruit (and yes, it is technically a fruit). Here’s a complete guide to everything you need to know.

Picking the right squash for the job
As many gardeners know, summer squash does not describe a specific species but rather the timing of the harvest. Yellow squash are harvested earlier in their life cycle, when the outer rind is still edible. No need to peel!

Read more