
How to design an English garden, no matter where you live

Designing an English garden is just a matter of figuring out what defines an English garden. No matter where you live, creating an inspired garden is quite simple. All you need to do is match the characteristics of an English garden to the best of your ability, which sometimes means altering some plants so that they’ll thrive and grow in your environment. These include green lawns, hedges, borders, beautiful flowers, grasses, and herbs. Remember that not every plant grows in every outdoor space, and your English-inspired garden will be unique to you, depending on which varieties you have at your disposal.

The two styles of English gardens

There are two types of English gardens: The English cottage garden and the English country garden. They each have their own characteristics and designs, and which one you choose to inspire your own space will ultimately be up to the aesthetic that speaks to you most.

English cottage gardens have a lot of personality. They’re often said to have an aspect of organized chaos, featuring beds and beds of colorful roses and grasses. Some of the key elements of these gardens will be stone paths, picket fences, and trellises. If you’ve always wanted to have an outdoor garden with a cute, quaint picket fence, this is the type of English garden you’ll want to gravitate toward as you put together your own design.

English country gardens are almost the opposite of the cottage garden. This garden type is all about defined lines: Trimmed hedges, clear garden beds, and lots of lush green lawn. The spaces for the flowers are often more defined, connected by paths from one area to another as opposed to a stone path winding through your greenery. This garden maintains a natural look, and out of the two is the one more easily done in a variety of spaces. If you have a smaller yard, this would be the style you’d want to imitate for a neat, successful look.

An English cottage garden stone path

Creating an English cottage garden

When it comes to creating an English cottage garden, we need to remember the core characteristics: Roses, picket fences, trellises, and stone paths. Often, instead of enclosing flowers with the picket fence, gardeners will do the opposite and surround a small section of a picket fence with flowers. There’s nothing saying you can’t do both; though, if you’re working in a small space, this idea of bringing in one section of a picket fence surrounded by flowers will surely be an asset to creating an English cottage-inspired garden.

One of the most important characteristics of an English cottage garden is that it does its best to mirror nature. That’s why beds are often undefined, and cottage gardens are referred to as being organized but chaotic. You’ll plant your own flowers, but allow them to grow new ones and reproduce (within reason) without being too worried about pruning them and keeping everything “perfect.”

Although the often undefined beds of flowers feature classic-colored roses, you can mix in other plants like lavender and foxglove, depending on how they’ll thrive in your area. Be sure you research which plants work best in your zone when growing an outdoor garden. The best part about inspiration is that it’s just that: Inspiration. If you can’t grow lavender outdoors, you can always find a flower for your zone that has a similar vibe.

An English country garden path
randy andy/Shutterstock

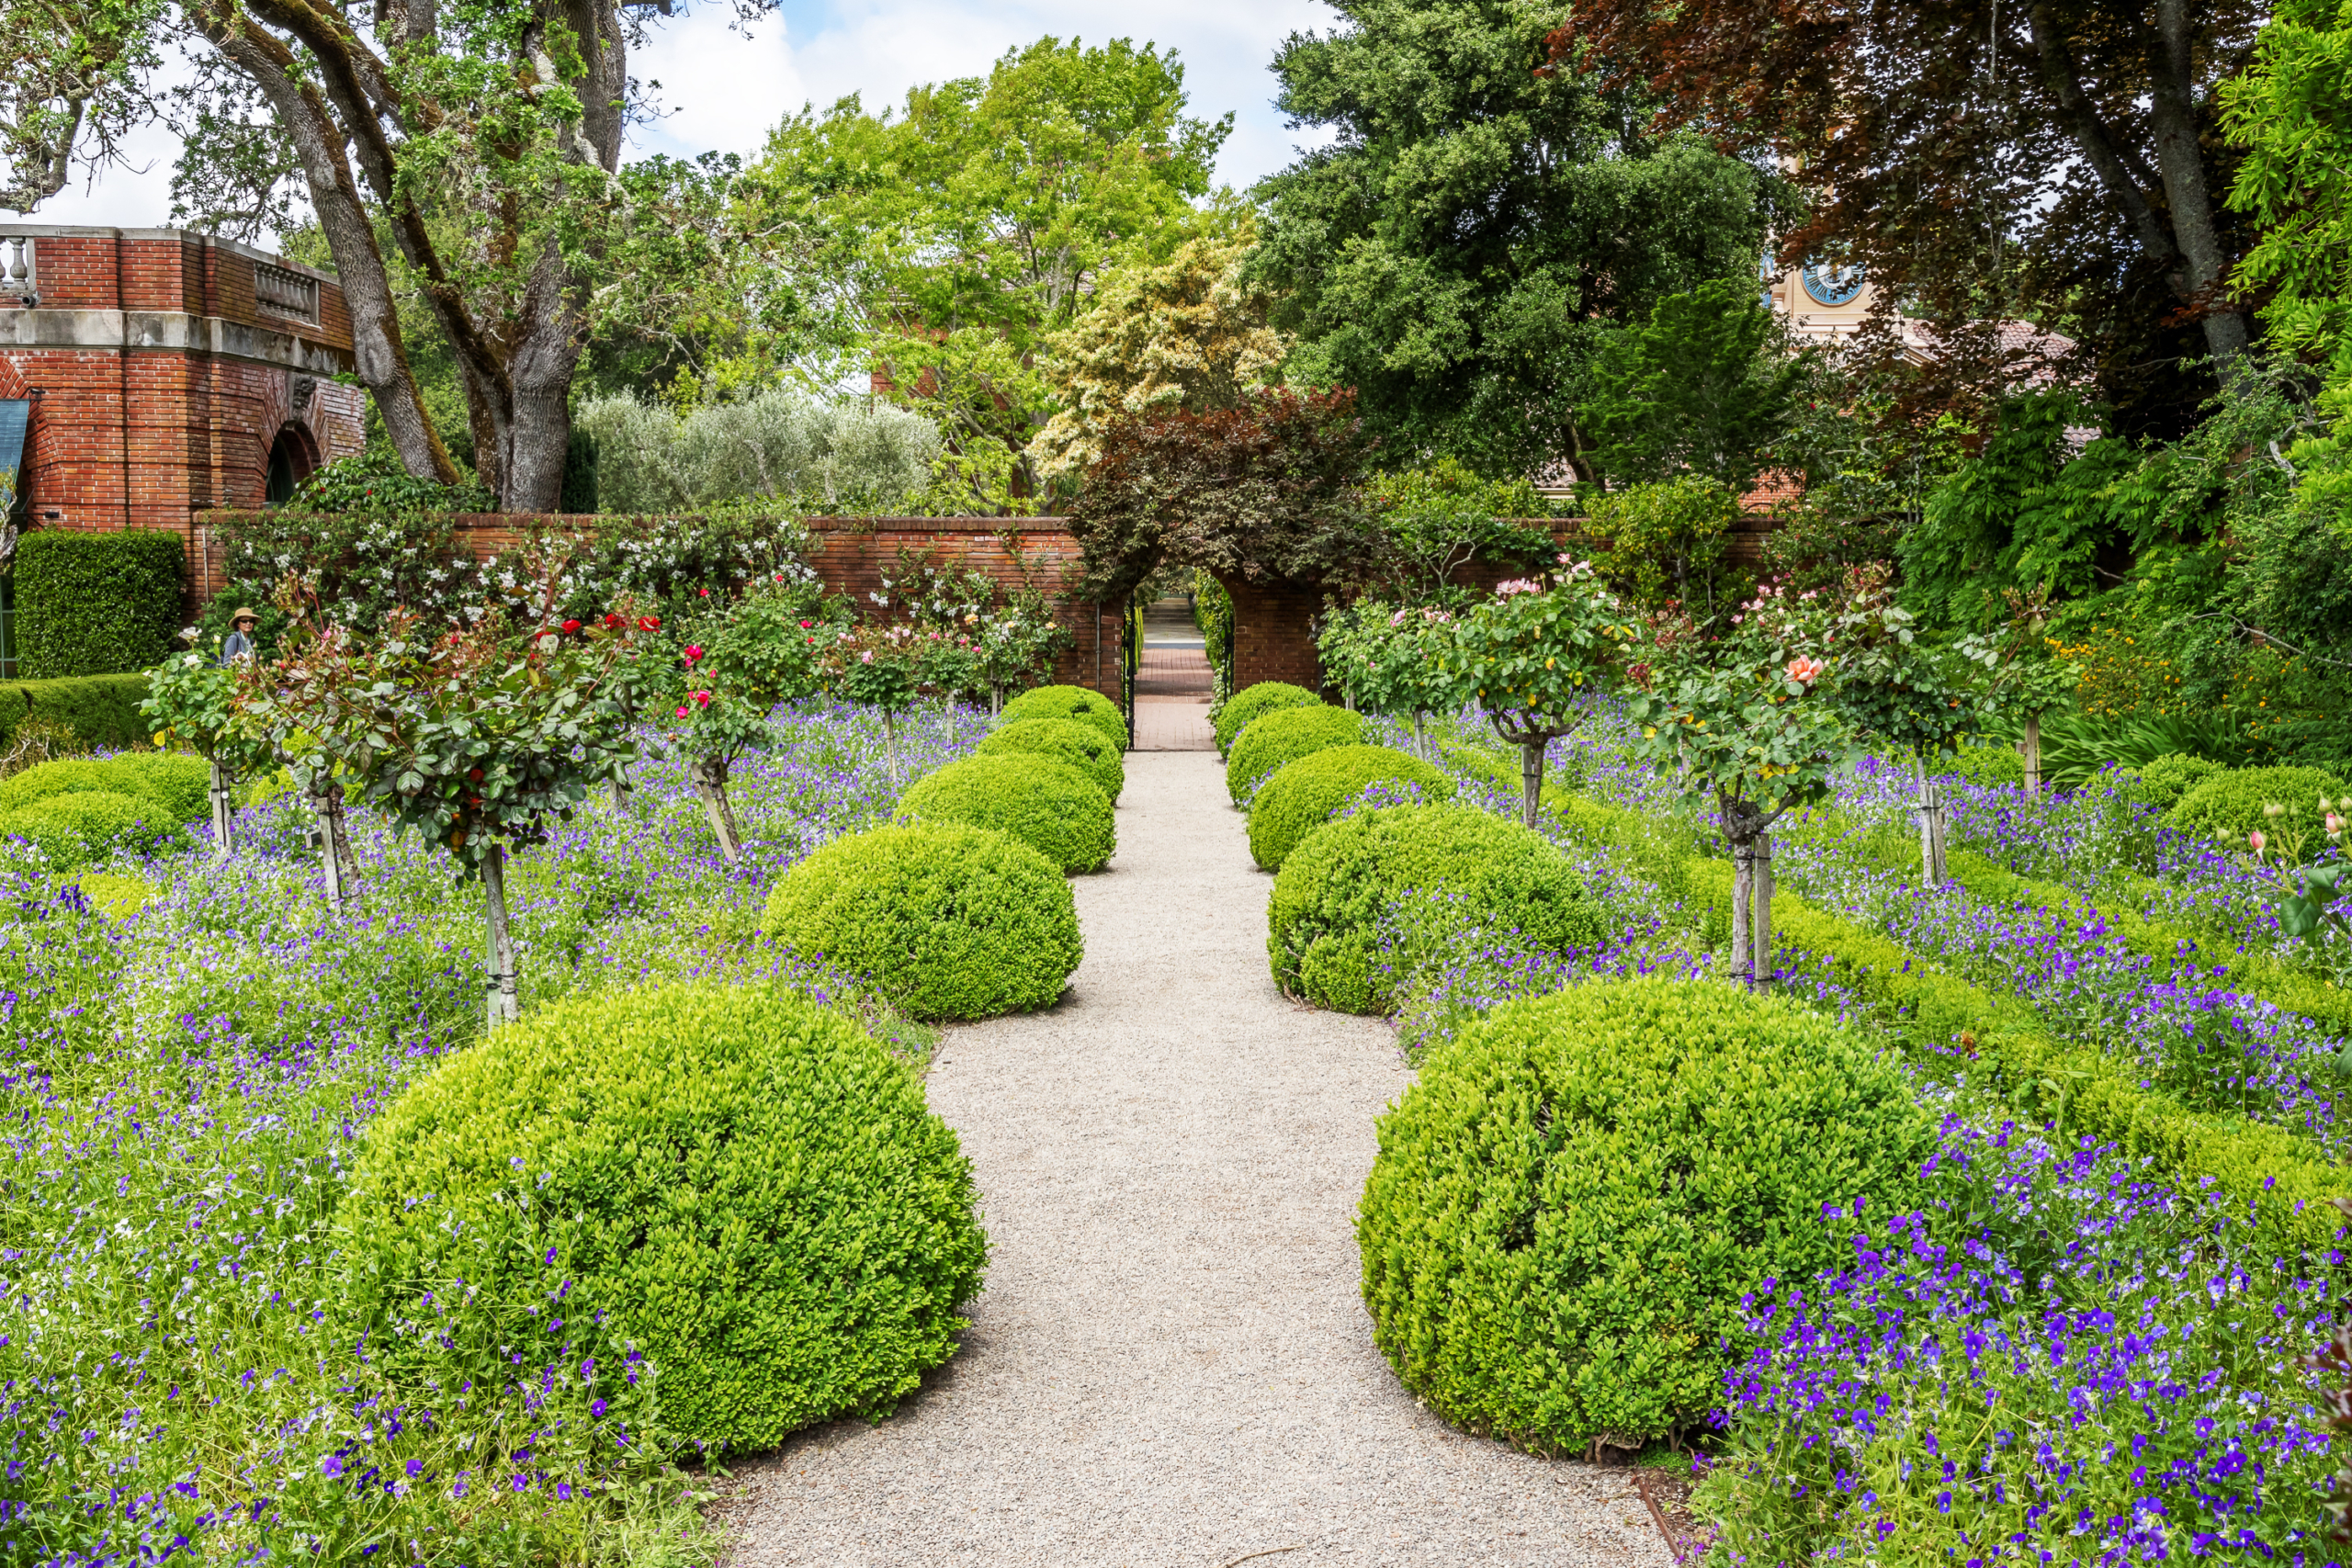
Creating an English country garden

English country gardens are made up of different garden areas that are neatly organized and connected by paths. This is a perfect style for anyone who likes a neatly trimmed, organized space. Because English country gardens were originally designed for large estates, they’re meant to be experienced on foot — and that doesn’t mean they can’t be recreated in a small space.

If you’re working with a smaller lawn, think carefully about sections of what plants and styles you can put together. If you have a tree you can put a bench under, create a seating area with two or three purposeful beds of flowers. Down the path (across the lawn), you can have boxes where you grow a different type of flower. Have another section with flowers and grasses that encircle a birdbath. This garden type is all about organization and defined spaces. Each area should have its own focal point, be it seating, a water feature (like a birdbath or small outdoor fountain), or garden boxes.

When starting a garden of blooms and using either type as inspiration, let your creativity shine by selecting features and flowers that work best for you and what you like. Not everything has to fit perfectly. Every garden will be different and unique, and the goal isn’t to identically recreate an English garden. Just keep in mind what defines an English garden, whether you choose cottage or country, and use those characteristics to inspire your own space.

Editors' Recommendations

Do grow lights really work? How to make sure you’re not wasting your money
Yellow glowing greenhouse at sunset

It's never been easier to garden indoors. Today, you can use grow lights to help cultivate many kinds of plants all year long, no matter where you happen to live. But, do grow lights work? Yes! Grow lights are designed to be a sunlight substitute that stimulates the photosynthesis process within plants by providing them with the right color spectrum.

You can grow all your favorite herbs, fruits, and vegetables year-round by using the correct bulb or fixture. Several kinds of grow lights are available on the market, with each having its own strengths and weaknesses. If you've been wondering whether grow lights would be an excellent investment for your greenhouse, we've got the answers.

Read more
3 of the best solar garden lights for a bright and eco-friendly yard
outdoor sitting with lights

It's important to decorate your garden with stunning flowers and veggies, but it's also vital that your garden be well lit. Whether for parties, late-night harvesting, or quiet nights reading in the warm summer air, solar lights make a fantastic addition to any garden. They can transform a backyard into a cozy after-dinner area, light up a walkway for safe navigation, or bring attention to a favorite tree. Here we'll be going over the essential considerations to keep in mind while shopping for solar garden lights. We'll also include a few of our favorites you might want to add to your landscaping.

What to consider when buying a solar garden light
Not all solar garden lights are created equal; there are a few things you'll want to keep in mind.
Cost
The cost is one of the most important aspects of purchasing a new item for almost everyone. Although solar garden lights are very similar in price, it's still crucial to consider how much you're willing to spend on lights before you go looking. Having a better idea of your budget will help you find the ideal solution.
Ease of install
If you need something easy to put up for a party this weekend, you won't want to buy a setup that'll take hours to put together. Instead, finding a solar light that's easy to install will make life easier and allow you to get back to doing other things like gardening!
Lifespan
Outdoor products never last as long as their indoor cousins, so it's not surprising to find that solar garden lights have a shorter shelf life than other indoor lights. However, this doesn't mean you should have to replace your garden lights every year or bring them in during the winter. Instead, look for a light that can withstand the types of weather you often see and be sure to care for the light properly so it can last a long time.
Aesthetic
Of course, you should like the way your new lights look! If they don't suit the aesthetic of your garden, you'll likely be disappointed and tempted to go looking for other options. So be sure you're looking for a light that's going to suit the rest of your garden, or at least blend in and not take away from your garden ornaments.
MAGGIFT Solar Pathway Lights
These pathway lights by MAGGIFT are ideal for lighting the way during the darker hours of the day. Whether it's the path from the driveway to the house or the deck to the flower garden, these lights will soak up sun rays and provide you with plenty of light to see your way.

Read more
When and how to transplant tomato plants for the best results
baby tomato plants

There's a time in every gardener's life when they try to grow their own veggie plants from seed. This is a gratifying process, and there are many benefits to growing your own seed starts. One of those benefits is bigger and healthier plants. By growing your own baby tomato plants, you can ensure that the plants are well cared for, never given anything you don't want them to have, and transplanted in just the right way at just the right time for optimal plant health. So how do you transplant tomato plants to ensure they're happy and healthy and live to produce lots of yummy tomatoes for your home?

How do you transplant a grown tomato plant?
If you've never transplanted tomatoes before, the idea can be intimidating. You have all these tiny plants that you've cared for over the last several weeks, and now it's time to pluck them out of their nursery pots and plop them into the outside soil where they're exposed to sun, weather, and critters. Luckily, you've cared for them so well that they're healthy and robust plants that will be able to handle anything nature throws at them.
Step one: Harden the plants
Hardening the plants is a term gardeners use when talking about the process of acclimating a greenhouse-grown plant to outside conditions. Typically it refers to sunlight, but it could also refer to wind and other weather that could harm the plant. About a week before you're ready to transplant, you'll want to harden your baby tomato plants by exposing them to sunlight at increasing increments each day. For example, day one should be about 30 minutes, then 45, then 50, and so on until the day of transplanting. If you don't do this, you'll risk your plant being burnt and killed when you transplant it outside.
Step two: Don't water the plants
Before you start pulling little plants out of their pots, you mustn't water the plants a few days before transplanting. Wet soil can make the transplanting process much harder on you and the plant. Dry soil falls away easier and is less likely to break off roots as you move the plants to their new home.
Step three: Prepare the new soil
The new location for your tomato plants will need to be prepped before you get all those babies out of their homes. Whether you are planting into the ground, a raised bed, or a pot, you'll want to amend the soil to guarantee that the plant has many nutrients to soak up. It also is easier if you dampen the soil right before transplanting. Damp soil is much more manageable and more easily manipulated around the plant.
Step four: Plant deeply
As you gently pull out the baby tomato plants, you'll want to shake off the old soil to expose the roots. This will ensure the plant has access to the new soil and nutrients you're about to provide it with. 

Read more